
Beach Craft Home Decor | How To DIY A High End Coastal Vintage Book with Seashell Spine
**This post contains affiliate links for your convenience. I may earn a small commission if you make a purchase from these links.**
One of my viewers asked if I could do some thrift flips with a high-end coastal decor theme and I thought it would be a fun challenge!
Follow along to learn How To Create A High-End Coastal Vintage Book with Seashell Spine.
Want to see all 4 of my high-end coastal decor thrift flip ideas? Watch Here

It is no secret that decorative pieces in home decor stores are not cheap! This thrift flip is a great way to create a high-end decor piece by using a vintage book you found at a thrift store, garage sale, or estate sale and updating it into something that will match your home and decor style.
Today, I thrift-flipped a beautiful blue vintage book into a high-end coastal decor piece that will sit beautifully on a mantle or bookshelf.
Below is a list of the items you will need to recreate this project:
Thrifted Book
Cornstarch
Baby Wipe or Clean Rag
*Product can be purchased directly through my website [www.juliesdesignsandsigns.com]
Let’s get started!
You are going to start by selecting a vintage book that has a large spine.

Using your IOD seashell clay mould you will want to dust the mat with cornstarch so that the clay does not stick to the mould.
If you notice that you have excess cornstarch in the mould then you can simply tap it out.

Using the IOD air dry clay you will want to push the clay into the mould.
The mould has a micro rim so you can easily run your fingers across the top to remove the excess clay.
I filled up the entire mould so that I could choose which shapes fit best on the spine of the book.

The clay seashells will pop out easily if you gently bend the mould as you pull each seashell out.

Next, arrange the seashells on the spine of the book based on what you think looks best.
TIP: Take a photo of the seashells on the book so that you don’t forget how to arrange them when gluing them back on.

Use your gorilla glue to glue each seashell to the spine of the book.
I do not wait until the clay is dry. Instead, I place them while the clay is soft so that the seashells easily curve around the edges of the book.

Use your gorilla glue to glue each seashell to the spine of the book.
I do not wait until the clay is dry. Instead, I place them while the clay is soft so that the seashells easily curve around the edges of the book.

When you are gluing the seashells onto the book you may need to brush out the excess glue with a small paintbrush and baby wipe.

Next, you will let the clay seashells dry for approximately 24 hours.
Once the clay is dry you will brush Fusion Antiquing Glaze over all the clay seashells to give them an aged look.
I use the STAALMEESTER® The One Series - Round Artist Brush to apply the antiquing glaze so that I can get into all of the edges of the clay seashells.
As you can see in the image, my seashells spill over the edges of the spine. I am decorating this book as a decorative piece that no longer needs to be opened. If you would like your book to still open, be sure to avoid placing the clay seashells over the edges of the spine.

My plan was only to put the antiquing glaze on the clay, however, while brushing the seashells I brushed a little excess onto the book. Fortunately, I loved how it looked on this beautiful blue color.
I decided to paint the antiquing glaze onto the book cover and love how it turned out!
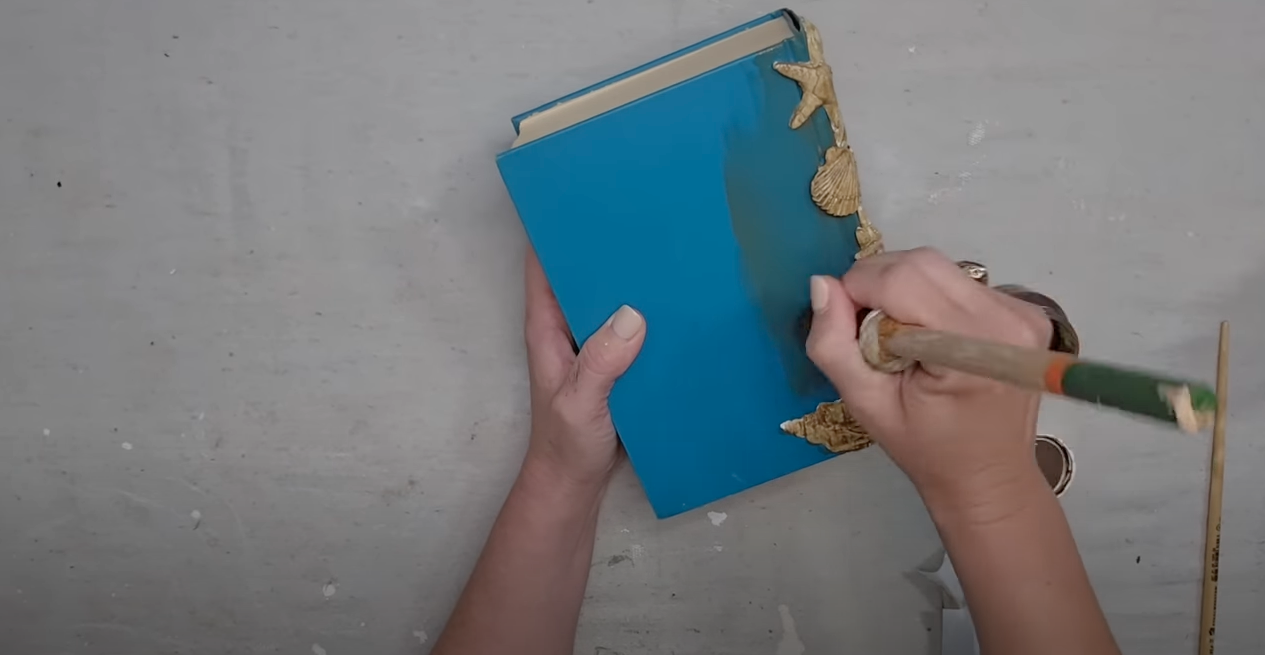
Lastly, take a dry paper towel or clean rag and lightly remove the excess antiquing glaze from the book and the clay seashells.

The seashells will now have the aged look that I desired!

That’s it!
Are you ready to try it for yourself? Be sure to comment below and share your final product!

As always, subscribe to my YouTube channel so that you never miss one of my DIY Thrift Flips.
You can watch me create this project and many others like it here: https://www.youtube.com/watch?v=-5UmRfdioRg&t=793s
Click the image to shop


While I have you here, don’t forget to join the Colors of the Month Club where you can receive (4) sample Fusion Paint colors picked by me that are perfect for the current season! → Click here to learn more
Like what you see? Be sure to join my mailing list for weekly DIY Ideas, thrift flips, new product alerts, video announcements, live events & more!
DISCLAIMER: This blog post may contain affiliate links. If you purchase a product or service with the links provided I may receive a small commission. There is no additional cost to you. Thank you for supporting my blog so I can continue to provide you with free content each week!