
Trash to Treasure - How To DIY Wooden Christmas Trees with Reclaimed Wood
**This post contains affiliate links for your convenience. I may earn a small commission if you make a purchase from these links.**
You all know I love a good trash to treasure. I stumbled upon this beautiful piece of wood on the side of the road and knew I had to create something unique out of it!
I think this wood was probably moulding at some point. It has a beautiful red tint with chippy white paint - it is perfect for Christmas!
In this blog, I will show you How To DIY Wooden Christmas Trees with Reclaimed Wood!

Below is a list of the items you will need to recreate this project:
Old Wood
Tape Measure
2in Nails
Spindles
*Product can be purchased directly through my website [www.juliesdesignsandsigns.com]
To start, I picked up a piece of wood and headed to my miter saw.
If you haven't got a miter saw yet, I recently invested in one that's been fantastic. Although it's a bit on the pricier side, it's incredibly user-friendly. If you're joining me on many wood DIY projects, this miter saw is an excellent addition to your crafting inventory!

First, I marked the center of my wood board.
Then, I turned my miter saw to 15 degrees.

I held my wood in place and then cut the piece at a 15-degree angle.
Do not throw away the scrap piece!

Then, I flipped the wood and proceeded to cut the other side at a 15-degree angle, mirroring the initial cut.
This triangular shape forms the body of our Christmas tree.

This is what your Christmas tree should look like once it is cut.

Remember when I mentioned not to toss the leftover scraps? We're about to use those to craft yet another Christmas tree!

If you align the two fresh, raw edges of your cuts, you'll form yet another Christmas tree.


The triangle Christmas trees looked great on their own but I decided I wanted to add a tree trunk to them.
You all know I love spindles and I have a bunch in my stash. I always pick these up when I see them!

I decided to go to my miter saw so I could cut down some pieces to use. You will want the base to be flat so that you can set your Christmas trees up on a dresser, side table or mantle.

After cutting down my spindles, I used two different methods to attach the spindles to my Christmas trees.
Drill the spindle into the base of the tree
Use wood glue & a nail gun to attach the spindle to the base of the tree

For the first method, I pick up one of the Christmas trees and my cordless drill.
Then, I drilled a hole into the center of the bottom of that Christmas tree.
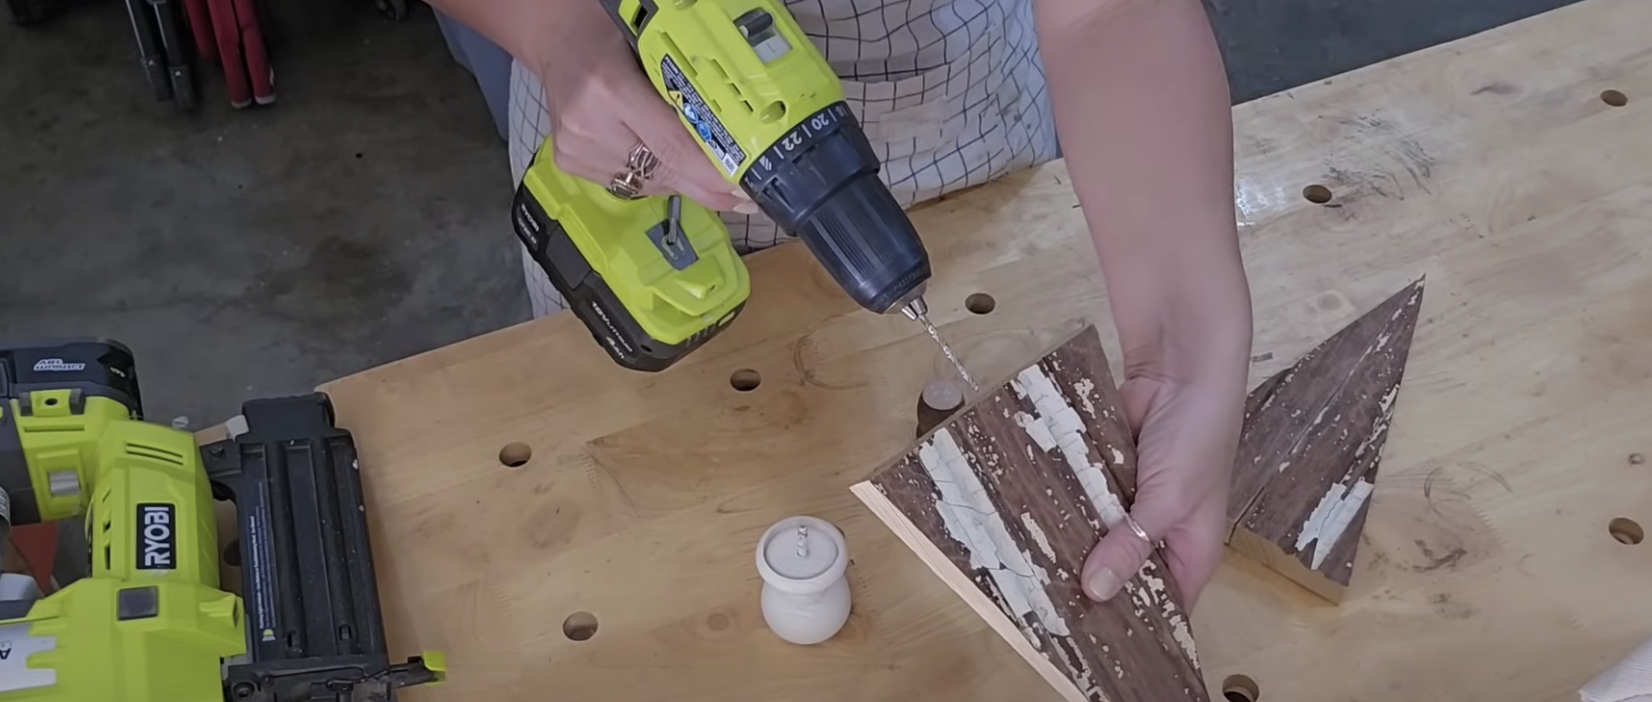
I screwed the spindle into the bottom of that Christmas Tree.
This spindle already had a screw, however, you might need to attach one yourself.

If you do not have a cordless drill handy, you can also use wood glue and a nail gun.
I used 2 inch nails so that they were long enough.
The nail will hold the spindle in place, but the glue will permanently keep it in place. If excess glue spills out, you can use a baby wipe to wipe that off.


My trees are looking beautiful but I have a few more steps to make them perfect!
I applied Fusion Antiquing Glaze to the fresh cuts of the trees, giving the wood an aged appearance that complements the rest of the Christmas tree.

You can see the difference between the wood that has antiquing glaze applied to it and the raw edge.

Don’t forget to apply the antiquing glaze to the bottom of your tree as well.

You have the option to cover the tree trunk to match your tree. I personally chose to apply Fusion Antiquing Glaze to mine!

Once I had my first tree created, I decided to cut down a bunch of wood pieces so that I could create a Christmas tree farm!
By utilizing various spindle sizes, I achieved varying tree heights, although each tree is of the same size.

The last thing to do is seal the paint into the wood. If you want to put your trees outside, Dixie Belle Gator Hide is a great seal to use.

All you have to do is grab a STAALMEESTER Pointed Sash Brush and Dixie Belle Gator Hide and apply a coat to the top of your tree.
I really liked how the sealer darkened up my trees a little bit!

I wanted to add a special touch to my trees, so I used rusty metal stars I bought years ago from Hobby Lobby.
While I'm unsure if they're still available, you might find something similar at a craft store.
I cut each star, leaving a bit of wire on each side, allowing me to wrap the wire around the tops of my trees.


How cute is this little wooden Christmas tree farm?

This blog is all about How To Create Wooden Christmas Trees with Old Wood!
Click Image To Shop


What Is The Colors Of The Month Club?
Don’t forget to join the Colors of the Month Club to receive (4) sample Fusion Paint colors I picked that are perfect for the current season! → Click here to learn more
Like what you see? Be sure to join our mailing list for weekly DIY Ideas, thrift flips, new product alerts, video announcements, live events & more!
DISCLAIMER: This blog post may contain affiliate links. If you purchase a product or service with the links provided I may receive a small commission. There is no additional cost to you. Thank you for supporting my blog so I can continue to provide you with free content each week!


DIY GUIDE: How to personalize your throw pillows with IOD stamps