
How To Use IOD Transfers
**This post contains affiliate links for your convenience. I may earn a small commission if you make a purchase from these links.**
If you're on the hunt for a budget-friendly DIY project that screams sophistication without breaking the bank, your search ends here!
Imagine creating something so stylish and unique that your guests won't believe it's a budget-friendly DIY.
This blog is your go-to guide for mastering the step-by-step process of using IOD transfers to create stunning, personalized creations.
With just a few tools, you'll be on your way to transforming ordinary items into extraordinary pieces of art.
In this blog, I will show you How To Use IOD Transfers!

Below is a list of the items you will need to recreate this project:
Thrifted Wooden Plaque
IOD Transfer tool (comes with the transfer)
Lace (you could also use ribbon, twine, burlap)
*Product can be purchased directly through my website [www.juliesdesignsandsigns.com]
I found this beautiful plaque from Goodwill and I loved the age of the wood edges.
As soon as I saw this piece I knew exactly what I wanted to create using IOD Transfers!

I am using Fusion Paint in the color Victorian Lace for this project.
Whenever I do a transfer, I love to use Fusion Paint because it has a built in sealer which makes the transfer comes off really well on the paint.


For this project, I applied paint to the middle portion and avoided getting paint on the beautiful wood trim background.
The secret to trimming is to use a good paint brush. I highly recommend using the STAALMEESTER Fitched Angled brush.


This floral image from IODs ephemeral melange transfer collection fits perfectly on this piece.
The ephemeral melange transfer is one of my absolute favorite transfers for Spring.
I have used this collection for so many different projects.

Once the paint dries the transfer can be applied.
First, I removed the white backing from the transfer.

Next, I placed the transfer directly onto the painted area where I wanted the image on the plaque.

Then, I used the transfer tool to apply the image to the painted area.

Next, I slowly removed the transfer paper.
If you notice that your image is lifting up, rub your transfer tool over that area again and slowly continue to peel the transfer paper back.
Set the grid transfer paper to the side because we are going to use it in a minute.
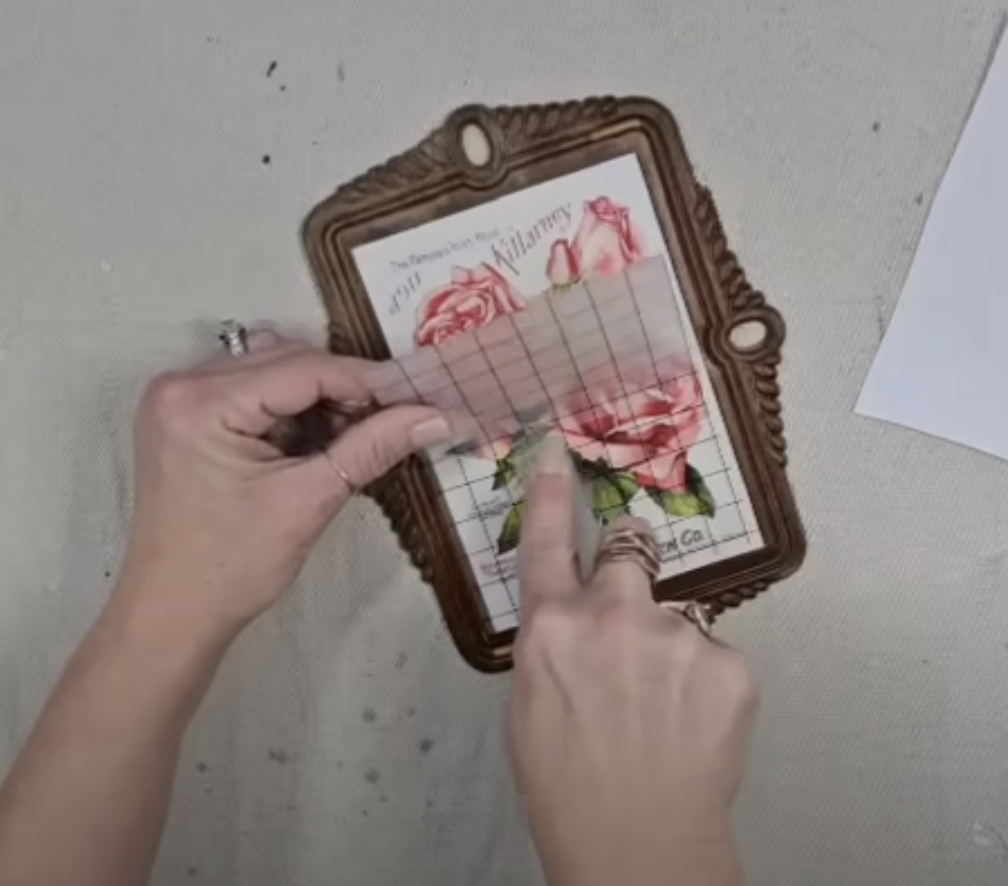
How beautiful is that? I love it!

IOD Transfer Hack :
Take the grid transfer paper and rub the ink side over your transferred image.
The raised pieces of the images will catch the black ink and it just adds a subtle distressing that looks so unique!


You can see the light black distressing in the bottom corner here!

Try out this hack and let me know what you think!
To hang this up in my home, I tied a piece of lace through the hole in the border.
Depending on the style of your home, you can use ribbon, lace, burlap, or twine to hang DIY projects!

And that’s it! How easy is that?
This is one of those projects that anyone can do, whether you're a DIY pro or just a beginner!
Are you ready to create your own? Be sure to share a photo and tag me on social media [@juliesdesignsandsigns] so I can see what you create.

This blog is all about How To Use IOD Transfers!
Click Image To Shop


What Is The Colors Of The Month Club?
Don’t forget to join the Colors of the Month Club to receive (4) sample Fusion Paint colors I picked that are perfect for the current season! → Click here to learn more
Like what you see? Be sure to join our mailing list for weekly DIY Ideas, thrift flips, new product alerts, video announcements, live events & more!
DISCLAIMER: This blog post may contain affiliate links. If you purchase a product or service with the links provided I may receive a small commission. There is no additional cost to you. Thank you for supporting my blog so I can continue to provide you with free content each week!


Transforming Your Thrift Store Finds Into High End Decor With The New Spring IOD Stamps and Moulds