
Simple & Easy Easter DIY Home Decorations
**This post contains affiliate links for your convenience. I may earn a small commission if you make a purchase from these links.**
Looking to add a touch of creativity to your Easter decor? These simple and easy DIY project idea will bring some rustic charm to your home decor style.
If you are looking for a budget friendly DIY project that even a brand new beginner could do - you’re in the right spot!
In this blog, I will show you How To Create Simple & Easy Easter DIY Home Decor!


Below is a list of the items you will need to recreate this project:
Drop Cloth
Pillow Stuffing
Jute Twine
*Product can be purchased directly through my website [www.juliesdesignsandsigns.com]
First, I lay two pieces of drop cloth on top of each other.
Then, using my craft scissors, I cut the drop cloth into various sizes of carrot shapes. This process creates two pieces of each different size.


Next, I used my hot glue gun to glue the two drop cloth pieces together.

Using a hot glue gun, I apply glue to the inside edge of the drop cloth but I leave a little bit of room so that the edges of the cloth can fray.
Since you will be stuffing your carrots next, do not glue the top pieces together.
You can watch me glue the pieces together here: Start at 6:20

Once all of the drop cloth pieces were glued together, I stuffed each piece with pillow stuffing.

Make sure to have a pencil or knife on hand to push the stuffing down to the bottom of the fabric, ensuring it fills the entire shape.
With small items like this, I like to make sure they are super stuffed!

This is the baby’s twilight bush - you can find it on my website!
This is one of my favorite pieces of greenery because it is the perfect shade of green.
I used clippers to cut off sprigs to use as the carrot stems.

Then, I placed a piece of the greenery inside the opening of the carrot.
I applied a little bit of hot glue to ensure the greenery stays attached.

Lastly, I used jute twine to tie the drop cloth around the greenery to accentuate the top of the carrot shape!


And that’s it! How cute is this easy Easter DIY project?
The perfect kind of subtle Easter decor!
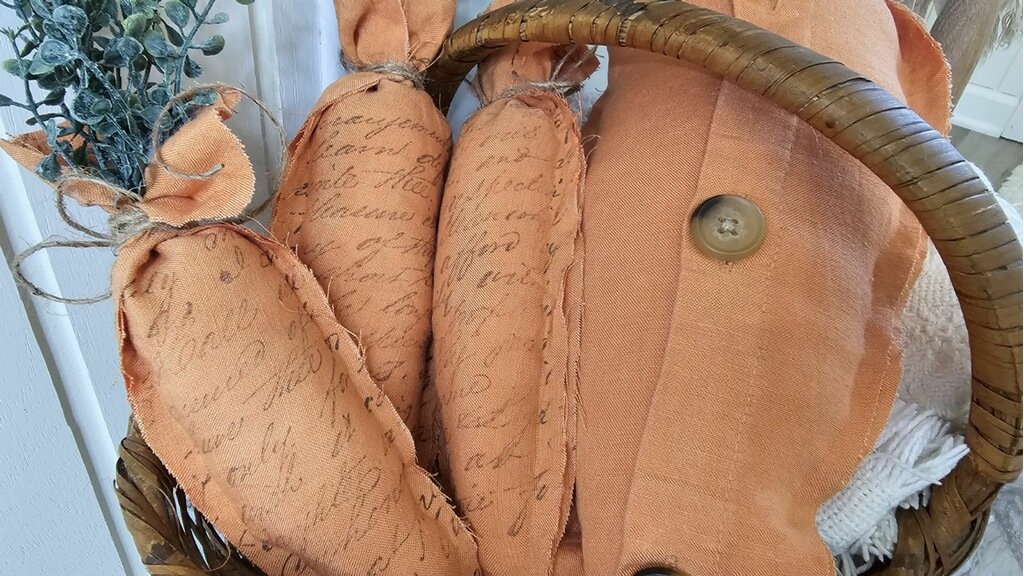
BONUS:
To create these stamped carrots I used the Kindest Regard IOD Stamp collection.
First, I applied IOD ink to an IOD empty ink stamp pad.
Second, I laid my IOD stamp onto a thin mount and then inked up the stamp.
Next, I transferred the stamp onto the fabric and let the ink dry.
Then, I followed the same steps as above to create each fabric carrot!


Are you ready to create your own? Be sure to share a photo and tag me on social media [@juliesdesignsandsigns] so I can see what you create.
This blog is all about How To Create Simple & Easy Easter DIY Home Decor
Click Image To Shop


What Is The Colors Of The Month Club?
Don’t forget to join the Colors of the Month Club to receive (4) sample Fusion Paint colors I picked that are perfect for the current season! → Click here to learn more
Like what you see? Be sure to join our mailing list for weekly DIY Ideas, thrift flips, new product alerts, video announcements, live events & more!
DISCLAIMER: This blog post may contain affiliate links. If you purchase a product or service with the links provided I may receive a small commission. There is no additional cost to you. Thank you for supporting my blog so I can continue to provide you with free content each week!


Transforming Your Thrift Store Finds Into High End Decor With The New Spring IOD Stamps and Moulds